Leveraging OCI Functions (Custom Scripts) in Oracle Analytics Cloud - Part 1
In a previous article I wrote about leveraging custom Python/R scripts in Oracle Analytics Server to give you greater control and flexibility over specific data processing needs. Unfortunately, the custom script feature is not available in Oracle Analytics Cloud, but you should not worry too much about it as there is an alternative: OCI functions!
In this article I'm going to illustrate how to create an OCI function from scratch. It will be followed soon by another one where I show you how to register the function in Oracle Analytics Cloud and invoke it from a data flow to transform your data.
About OCI Functions
OCI Functions is a fully managed, multi-tenant, highly scalable, on-demand, Functions-as-a-Service platform powered by the Fn Project open source engine. With OCI Functions, you can write code in different languages, deploy it, call it directly or trigger it in response to events, and get billed only for the resources consumed during the execution.
In OCI Functions, functions are grouped into applications, stored as Docker images in a specified Docker registry, and invoked in response to a CLI command or signed HTTP request. When a function is invoked for the first time, OCI Functions pulls the function's Docker image from the specified Docker registry, runs it as a Docker container, and executes the function. If there are subsequent requests to the same function, OCI Functions directs those requests to the same container. After a period being idle, the Docker container is removed.
Prerequisites
Before creating an OCI function all the following prerequisites must be satisfied if you want to invoke it from Oracle Analytics Cloud:
- Create an auth token
- Create a container registry
- Create an Object Storage bucket
- Ensure OCI Functions can access the required resources
- Create an application
Creating an Auth Token
An auth token for the user account who will be creating and deploying the function is required to authenticate when logging Docker in to OCI Registry.
To create an auth token log in to the OCI Console, open the Profile menu, and click on the User Settings option (Figure 1).

In the User Details page scroll down to display the Resources pane, select Auth Tokens, and click on the Generate Token button (Figure 2).

In the Generate Token dialog, enter a name for your token, and click on the Generate Token button (Figure 3).

The new auth token is generated and you have the option of showing and/or copying it (Figure 4). I highly recommend to save it in a secure location before clicking on the Close button since you won't see it again in the OCI Console.

Creating a Container Registry
A container registry must be used as the repository for your functions. It allows you to store, share, and manage container images (such as Docker images) easily, without worrying about operational issues, or scaling the underlying infrastructure.
To create a registry open the navigation menu in the OCI Console, select Developer Services, and click on the Container Registry option (Figure 5).

In the Container Registry page, click on the Create repository button (Figure 6).
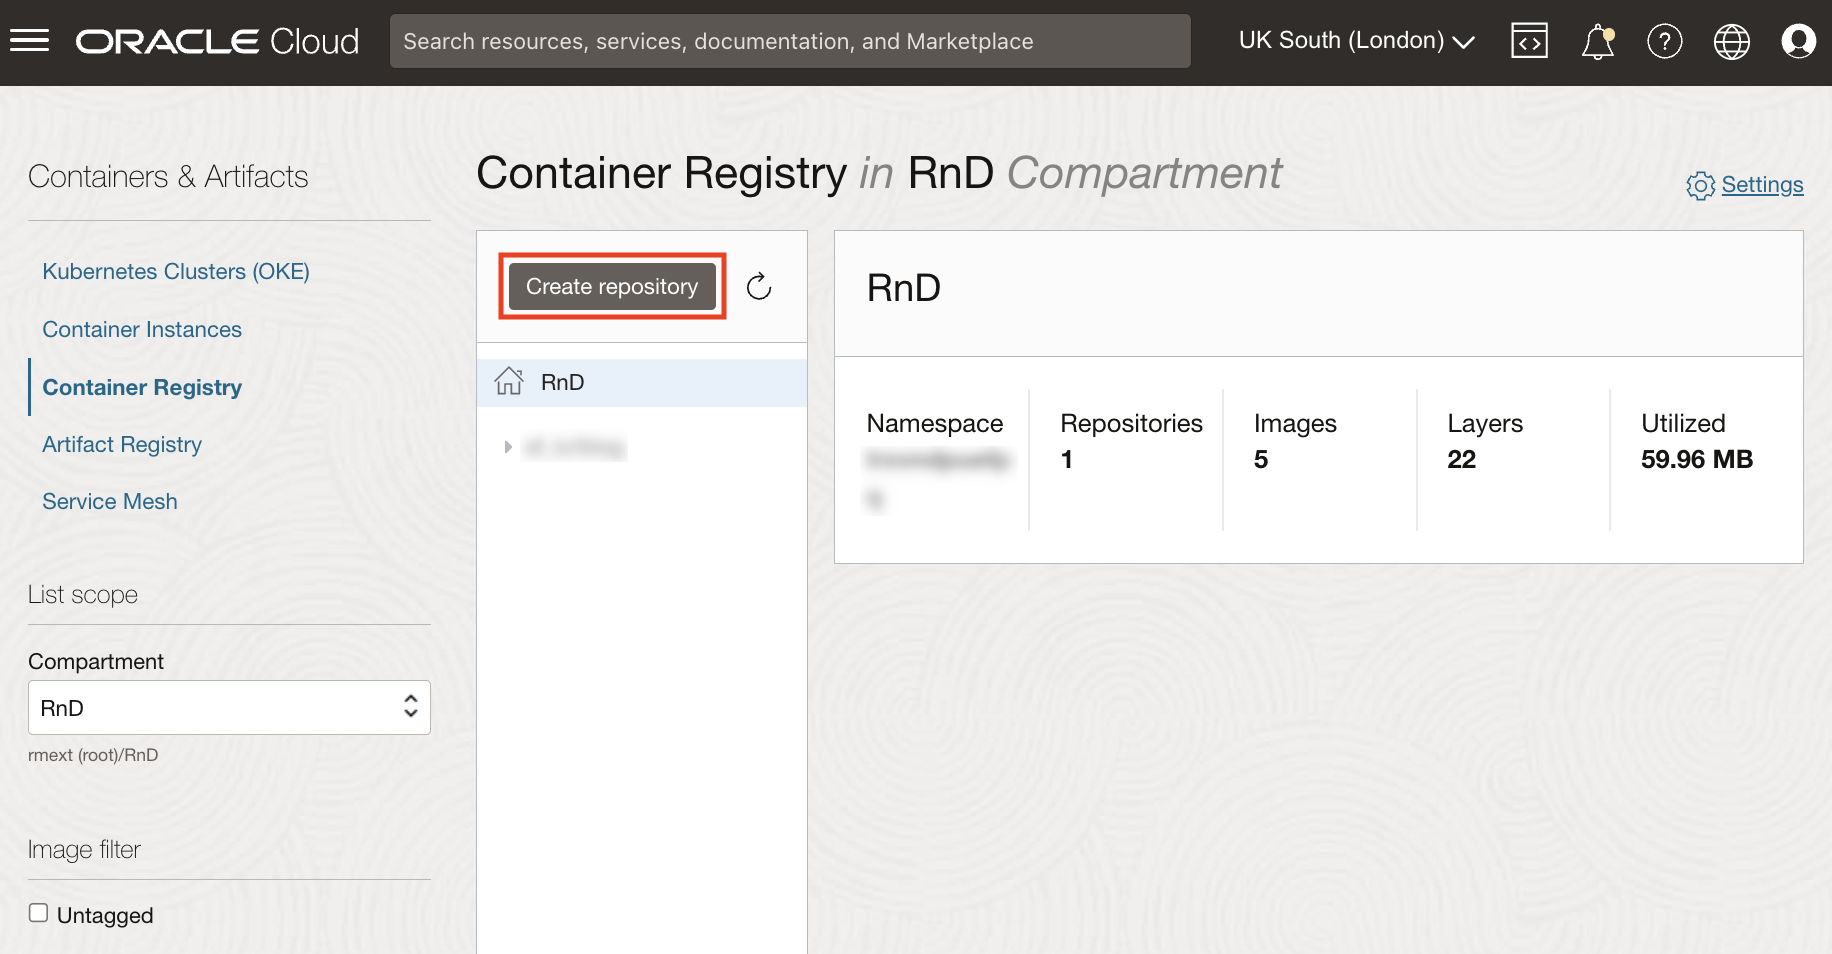
In the Create repository dialog, select the appropriate compartment, enter a name for the repository, and click on the Create repository button (Figure 7).

Creating an Object Storage Bucket
OCI functions and Oracle Analytics Cloud communicate with each other through buckets which are logical containers for storing any type of data in the OCI Object Storage service.
When a function is invoked from a data flow, any input data is copied as a CSV file in a bucket that you specify. The same happens to the output of the function when it completes its tasks. Input and output CSV files are automatically deleted from the bucket once they are no longer required, but sometimes you may have to do it manually (e.g. after a function or OAC failure).
To create a bucket open the navigation menu in the OCI Console, select Storage, and click on the Buckets option (Figure 8).

In the Buckets page, select the appropriate compartment, and click on the Create Bucket button (Figure 9).
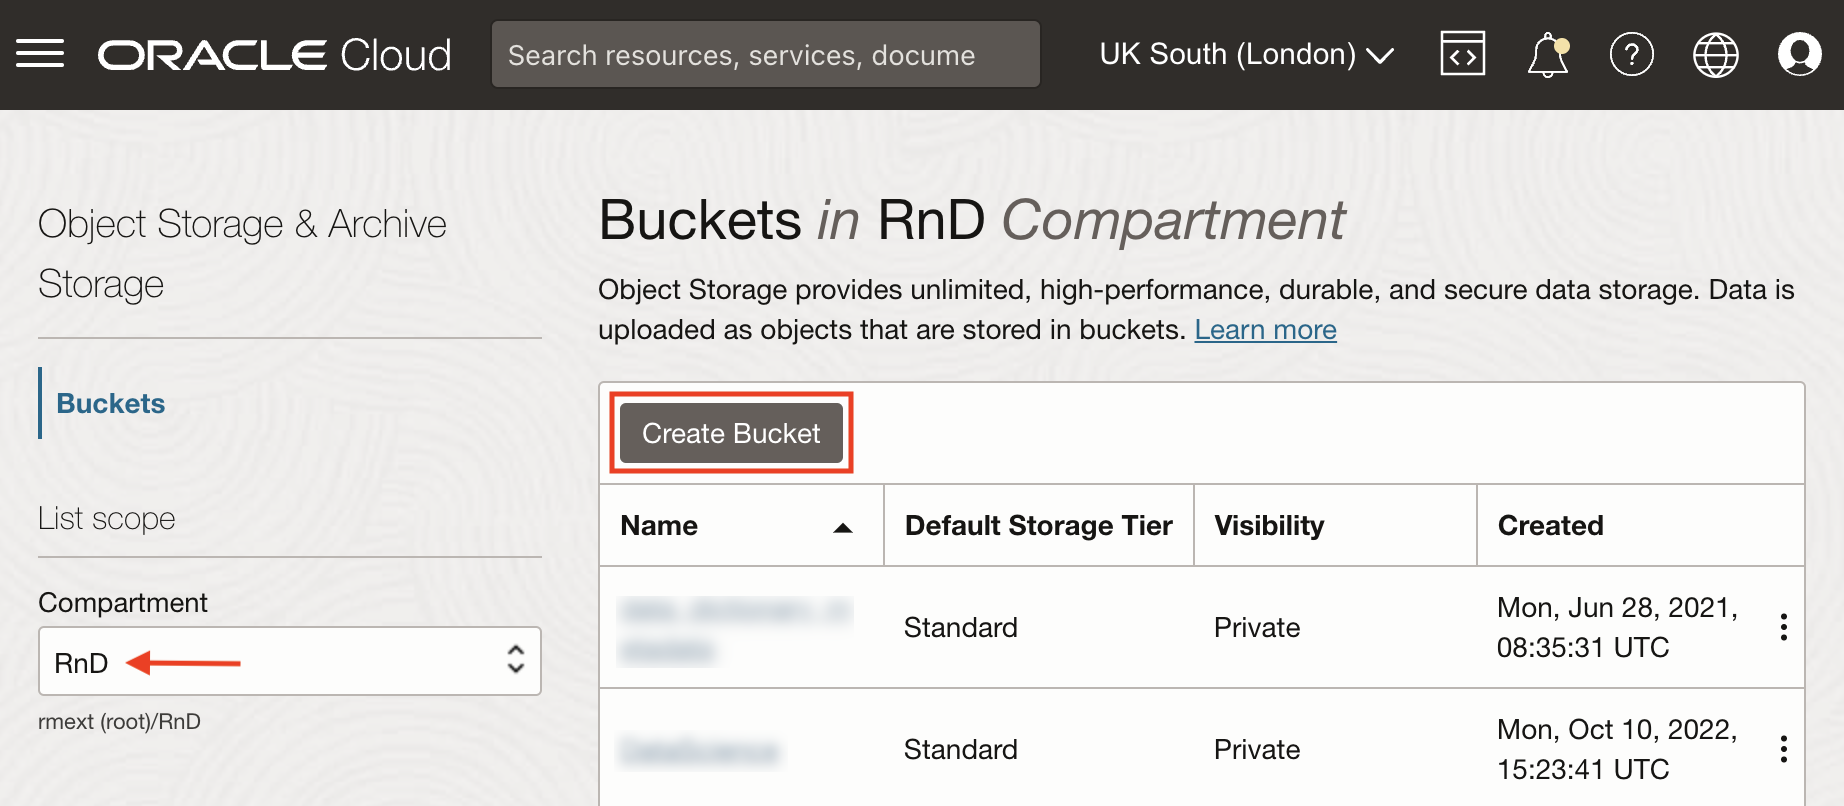
In the Create Bucket dialog, enter a name for the bucket, accept the default settings, and click on the Create button (Figure 10). Remember that bucket names must be unique within the namespace and cannot be changed from the Console.

Ensuring OCI Function Can Access the Required Resources
The OCI Functions service needs permission to access any other OCI resource required by the function logic such as Object Store buckets.
To ensure the function can access the bucket, open the navigation menu in the OCI Console, select Identity & Security, and click on the Dynamic Groups option (Figure 11).

In the Dynamic Groups page, click on the Create Dynamic Group button (Figure 12). Dynamic groups allow you to group OCI compute instances (i.e. the functions) as principal actors, so that they can make API calls against OCI services (i.e. the buckets).

In the Create Dynamic Group page (Figure 13), enter a name for the dynamic group, a description, and specify the following matching rules before clicking on the Create button:
resource.type = 'fnfnc'
resource.compartment.id = 'COMPARTMENT_OCID'
While the first rule allows you to group all function resources, the second one restricts the selection to a specific compartment. COMPARTMENT_OCID must be replaced with the unique identifier for the compartment where you want to create your functions. To retrieve it, open the navigation menu in the OCI Console, select Identity & Security, then Compartments, and click on the compartment that you are interested in.
Open the navigation menu in the OCI Console, select Identity & Security, and click on the Policies option (Figure 14).
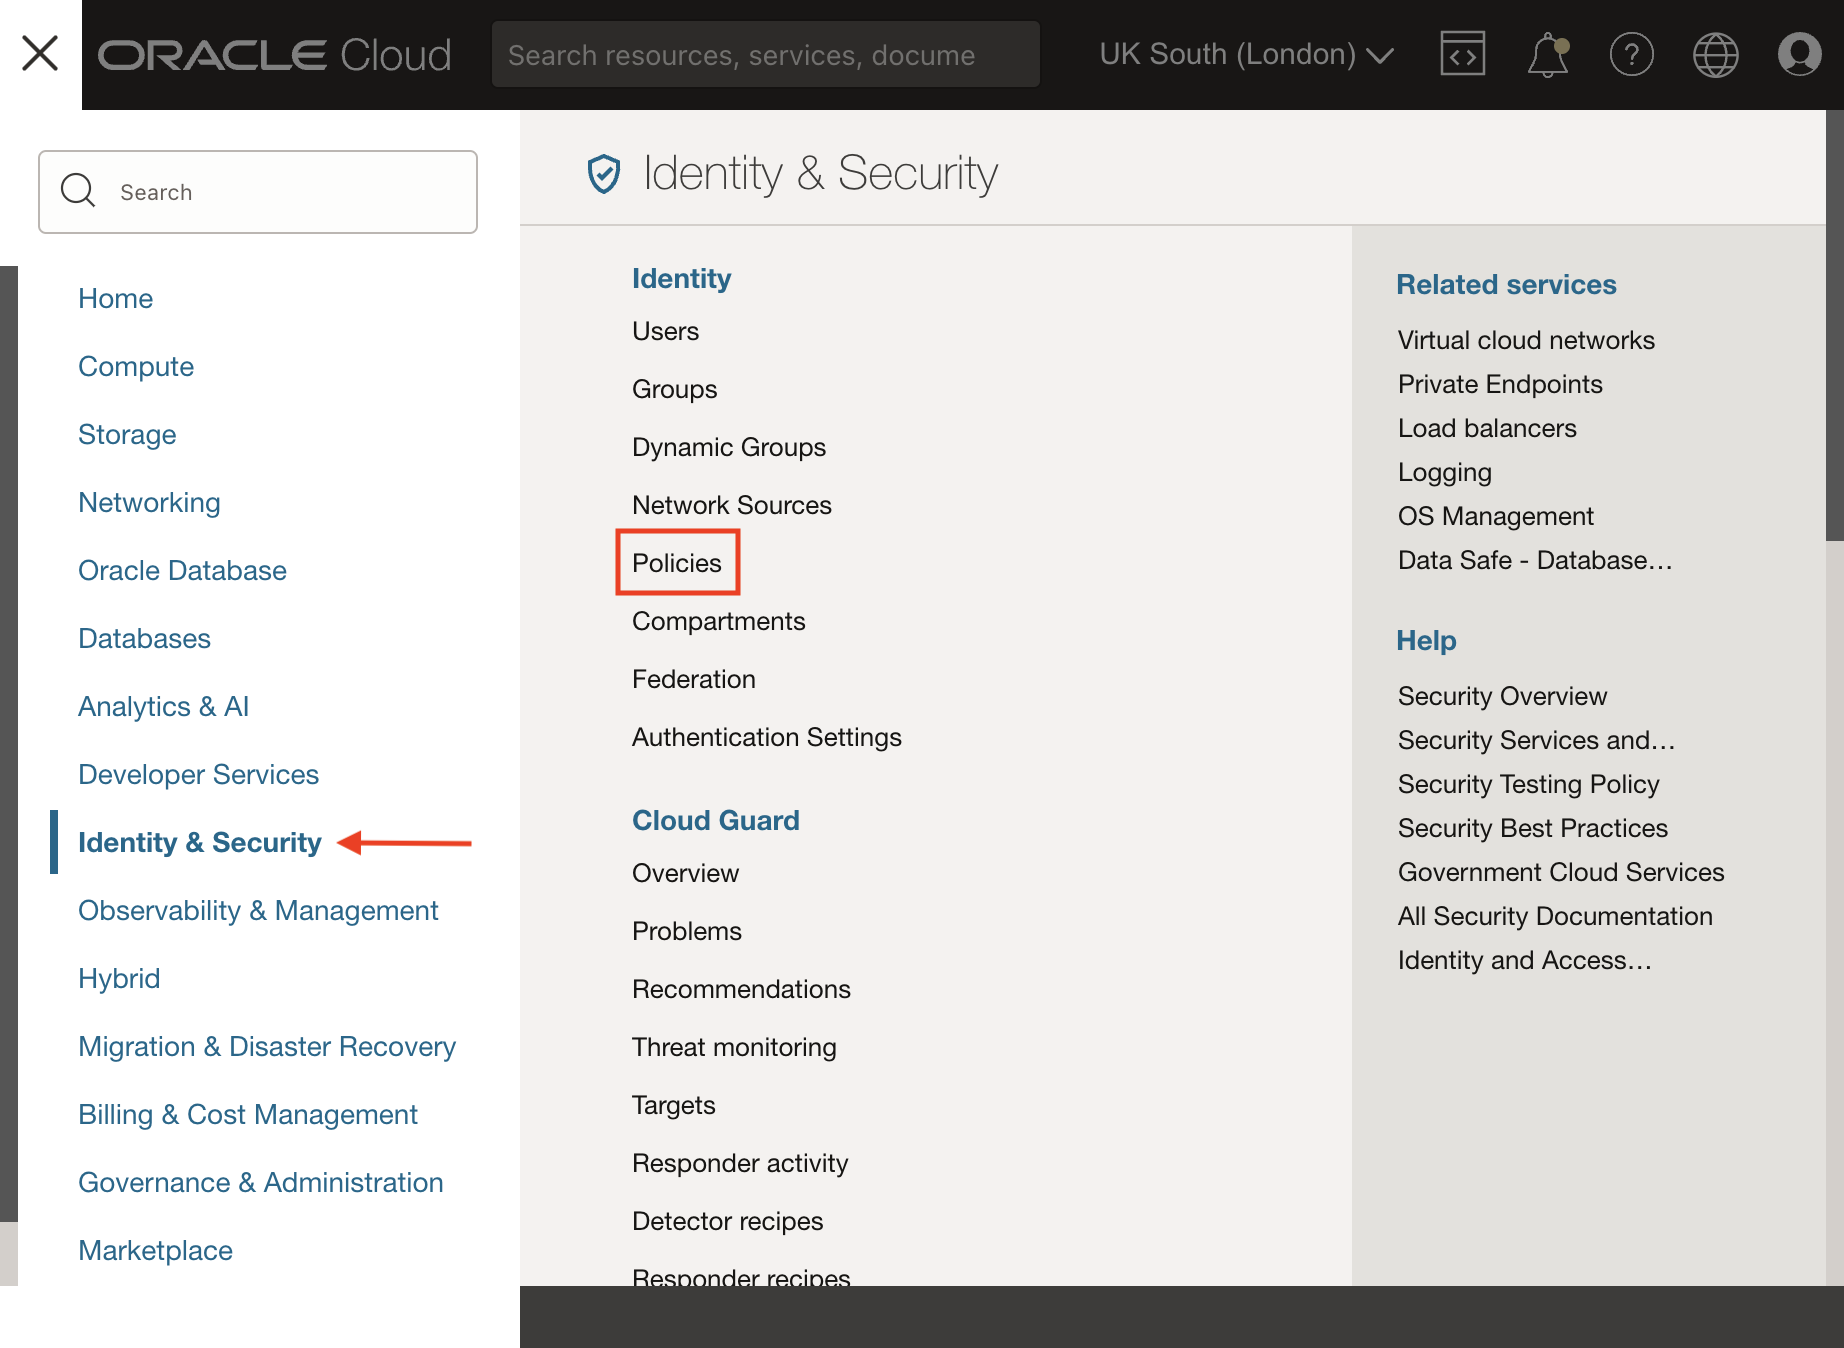
In the Policies page, click on the Create Policy button (Figure 15). A policy is basically a document that allows a group to work in certain ways with specific resources in a particular compartment.

In the Create Policy page (Figure 16), enter a name and a description for the policy, select the proper compartment, switch on Show manual editor, and enter the following policy before clicking on the Create button:
allow dynamic-group DYNAMIC_GROUP_NAME to manage objects in compartment BUCKET_COMPARTMENT_NAME where all {target.bucket.name = 'BUCKET_NAME'}
The policy above ensures that the function I'm going to create is able to access the bucket, and share data with Oracle Analytics Cloud. DYNAMIC_GROUP_NAME must be replaced with the name of the previously created dynamic group, BUCKET_COMPARTMENT_NAME with the name of the compartment that contains the bucket, and BUCKET_NAME with the name of the bucket.
Creating an Application
In OCI Functions, an application is a logical grouping of functions that provides a common context to store configuration variables, ensure runtime isolation, allocate and configure resources.
To create an application, open the navigation menu in the OCI Console, select Developer Services, and click on the Applications option (Figure 17).

In the Applications page, select the appropriate compartment, and click on the Create application button (Figure 18).

In the Create application dialog, enter a name for the application, select a VCN and a subnet, and click on the Create button (Figure 19).

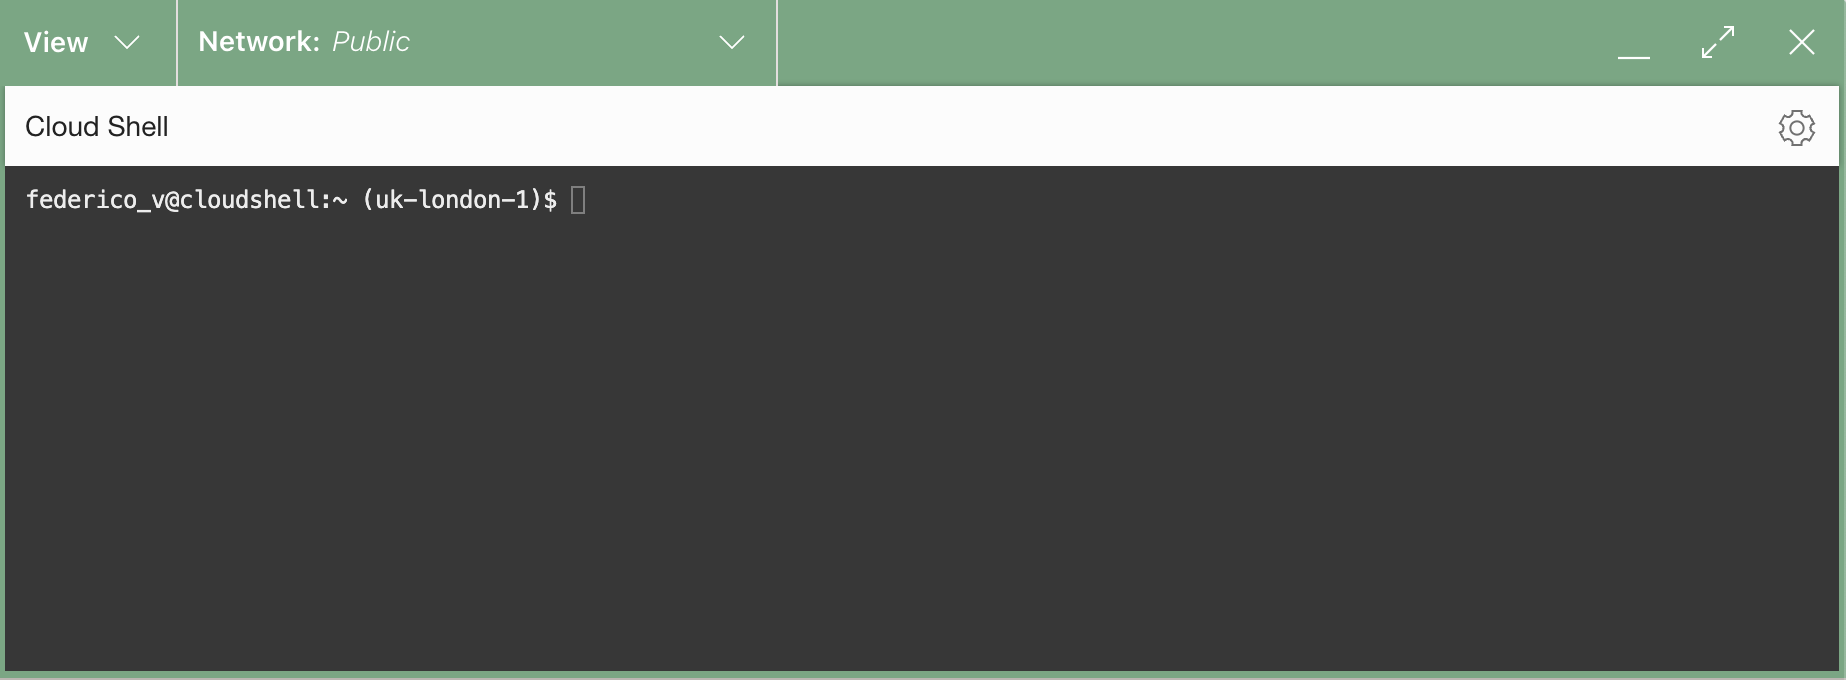
Setting Up the Cloud Shell
Cloud Shell is a web browser-based terminal accessible from the OCI Console that can be used to create, update, invoke and test functions.
Open the page of the application previously created, scroll down, and select the Getting started option in the Resource pane. Make sure that Cloud Shell setup is selected, and click on the Launch Cloud Shell button to start configuring your Cloud Shell (Figure 20).

The Cloud Shell will be displayed at the bottom of the page (Figure 21).
As an alternative, click on the Developer tools icon, and select the Cloud Shell option to display the Cloud Shell (Figure 22).

Several commands must be executed in the Cloud Shell in order to set it up properly. First of all, you have to use the proper context for your region (replace REGION_NAME with the name of your region):
fn use context REGION_NAMEUpdate the context with the OCID of the compartment (COMPARTMENT_OCID) where you want to create your functions:
fn update context COMPARTMENT_OCIDThen provide a unique repository name to distinguish your function images from other people's (replace REGION_KEY, TENANCY_NAMESPACE and REPOSITORY_NAME as required):
fn update context registry REGION_KEY.ocir.io/TENANCY_NAMESPACE/REPOSITORY_NAMELog into the registry using the auth token previously created as your password (replace TENANCY_NAMESPACE, USER_NAME and REGION_KEY as required):
docker login -u 'TENANCY_NAMESPACE/oracleidentitycloudservice/USER_NAME' REGION_KEY.ocir.ioVerify now your setup by listing the applications in the compartment:
fn list appsCreating the Function
Everything is finally ready to create functions! In this session I'm going to illustrate how to create a function for detecting the language of the text in a given input column.
Open the Cloud Shell, and execute the following command to initialize a Python function called detect-language:
fn init --runtime python detect-languageThe command above creates a folder (with the same name that you specified for the function) containing three files:
func.py- contains the code and logic of the functionfunc.yaml- contains the minimum amount of information required to build and run the functionrequirements.txt- contains a list of libraries required to execute the function
To be able to invoke a function from Oracle Analytics Cloud, the handler function in func.py must include the funcMode variable to handle the function mode and operate in different ways depending on the value on the variable. The following code can be used as a starting point and customized as required:
def handler(ctx, data: io.BytesIO=None):
  response_data = ""
  try:
    body = json.loads(data.getValue())
    funcMode = body.get("funcMode")
    if funcMode == 'describeFunction':
      response_data = json.dumps(funcDefinition)
    elif funcMode == 'executeFunction':
      # ADD YOUR LOGIC HERE
  except (Exception, ValueError) as ex:
    # HANDLE EXCEPTIONS
  return response.Response(
    ctx, response_data,
    headers={"Content-Type": "application/json"}
  )
To register a function, Oracle Analytics Cloud sends a request to OCI Functions where the value of funcMode is describeFunction, and expects the function to return its definition as a JSON object in the following format:
funcDefinition = {
  "status": {
    "returnCode": 0,
    "errorMessage": ""
  },
  "funcDescription": {
    "outputs": [
      {
        "name": "language",
        "dataType": "varchar(100)"
      }
    ],
    "parameters": [
      {
        "name": "textColumn",
        "displayName": "Text Column",
        "description": "The input column for detecting language",
        "required": True,
        "value": {"type": "column"}
      }
    ],
    "bucketName": "federico-bucket",
    "isOutputJoinableWithInput": True
  }
}
According to the JSON object above, the function requires one column as input (textColumn), returns one output column (language) that will be appended to the input dataset in a data flow ("isOutputJoinableWithInput": True), and federico-bucket bucket will be used to share data between Oracle Analytics Cloud and OCI Functions. The function definition object can be customized according to your requirements: for instance, if you don't want to include any input column in the result set of the data flow set "isOutputJoinableWithInput": False.
To invoke a function, Oracle Analytics Cloud sends a request to OCI Functions where the value of funcMode is executeFunction, and expects the function to generate as output a CSV file in the bucket specified in the definition. The request object is again in JSON format:
{
  "args":
  {
    "textColumn": "Review"
  },
  "funcMode": "executeFunction",
  "input":
  {
    "bucketName": "federico-bucket",
    "fileExtension": ".csv",
    "fileName": "oac-fn-XXXXX-input",
    "method": "csv",
    "rowID": "row_id"
  },
  "output":
  {
    "bucketName": "federico-bucket",
    "fileExtension": ".csv",
    "fileName": "oac-fn-XXXXX-output"
  }
}
According to the JSON object above, the function has been invoked with the Review column as input, its values will be copied to the federico-bucket bucket in CSV format (oac-fn-XXXXX-input.csv), and Oracle Analytics Cloud will wait for the output of the function to be copied to the same bucket as oac-fn-XXXXX-output.csv.
The following code can be used to read the response object in order to handle input and output data properly in your function:
input_method = body.get("input").get("method")
  if input_method == "csv":
    bucketName = body.get("input").get("bucketName")
    inputFile = body.get("input").get("fileName") +
      body.get("input").get("fileExtension")
    rowID = body.get("input").get("rowID")
    textColumn = body.get("args").get("textColumn")
    outputFile = body.get("output").get("fileName") +
      body.get("output").get("fileExtension")
Reading data from a bucket is easier than expected using ocifs since it allows us to use Object Storage natively from Pandas:
input_data = pandas.read_csv("oci://" + bucketName + "/" + inputFile)
In a similar way we can also write data to a bucket:
output_data = detect_language(input_data, textColumn)
output_data.to_csv("oci://" + bucketName + "/" outputFile, index=True, index_label=rowID)
To detect the language I used langid, a standalone language identification tool:
def detect_language(input_data, textColumn):
  languages = []
  for value in input_data[textColumn]:
    prediction = langid.classify(value)
    languages.append(prediction[0])
  tmp = pandas.DataFrame(languages, columns=["language"])
  return tmp
Once func.py has been updated with your code logic and requirements.txt with any libraries you will be utilizing (e.g. langid, pandas and ocifs in my case), do not forget to deploy the function to the registry by executing the following command in the Cloud Shell (replace APPLICATION_NAME with your application name):
fn -v deploy -app APPLICATION_NAMEfunc.py, func.yaml or requirements.txt.The source code of my detect-language function is attached below, feel free to use it as a reference to create your own OCI functions.
Conclusion
Business analysts and end-users often want greater control when performing data preparation tasks. In this context, leveraging OCI functions into Oracle Analytics Cloud can give you full control and flexibility over specific data processing needs. This article illustrates how to create OCI functions from scratch, and the next one, where I show you how to register the function in Oracle Analytics Cloud and invoke it from a data flow, will follow soon.
If you are looking into leveraging OCI functions into Oracle Analytics Cloud and want to find out more, please do get in touch or DM me on Twitter @barretbse.
Member discussion